
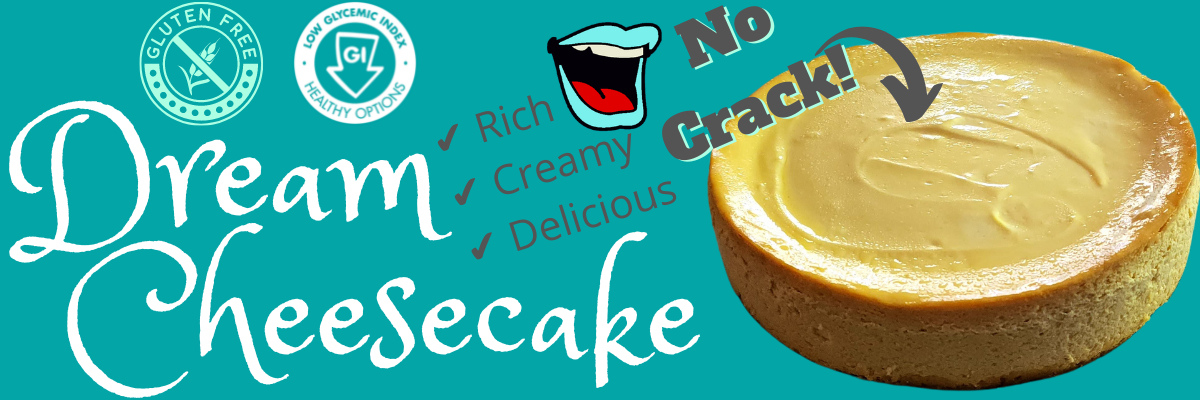
Cheesecake Dream
When you think cheesecake, chances are the first thing that comes to mind is a dense, cracked dessert that needs toppings to taste great. But what if we told you there was a way to make a creamy cheesecake that would not crack, is Low GI, gluten-free, and tastes better than any cheesecake you have ever had (even without toppings)? This unconventional take on the classic is not only safe for diabetics and people with an intolerance to gluten, but it is creamier and is so good that my family prefers to go without any toppings! So whether you’re looking for something new to impress your guests or just something to enjoy in private, give my Dream Cheesecake recipe a try.
Dream in Moderation
Like most people, you’ve probably heard that everything in moderation is the key to a healthy diet. But what does that mean, exactly? Is it really OK to indulge in your favorite treats occasionally, or should you strive for a completely balanced diet at all times? Does a lifestyle change mean saying goodbye to your favorite foods like a Dream Cheesecake?
The answer is that it depends on what you’re eating. Some foods are healthier in moderation than others. For example, it’s generally better to enjoy a rich dessert occasionally than to have one every day. Agave nectar is made from the sap of the agave plant and is considered a low-glycemic sweetener because it doesn’t cause blood sugar levels to spike the way white sugar does.
While agave nectar is healthier than white sugar, it’s still high in calories and should be consumed in moderation. I am so excited to share this recipe I created because it means more people don’t have to say goodbye to rich, creamy cheesecake forever! Not only that, but I often hear it tastes better than any normal cheesecake!
Why Agave Nectar in a Cheesecake?
Agave nectar is a rich, low glycemic sweetener that doesn’t have the aftertaste of other sweeteners like honey or maple syrup. It’s easy to mix with other ingredients and perfect for baking or sweetening coffee or tea. Agave nectar is also diabetic-friendly because it doesn’t cause blood sugar spikes. As someone who had gastric bypass surgery (which cured my diabetes), I wanted a recipe that would not raise blood sugar, so I fiddled with the ingredients until I got this perfect Dream Cheesecake.
Another key to this cheesecake’s success is that agave nectar is a liquid. This means it is easier to incorporate into the filling. You also do not need to worry about a grainy consistency as with sugar-which can sometimes not dissolve properly in recipes. This is a great trait, but my favorite perk of using agave nectar is that it is sweeter than sugar. This means that not only does it have fewer calories, but it also means you will consume even fewer to get the same sweetness in anything!
Almond flour Crust?
Looking for a gluten-free, low-carb alternative to graham crackers? Almond flour makes a great crust for cheesecakes and other desserts. If you still prefer the traditional graham cracker crust, go for it! I just wanted this recipe to be something more people could enjoy. This makes it great for pot-lucks, food days at work, or even a Tuesday night!
No Cracks in this Cheesecake!
Forget the water bath! They can not only be messy and annoying, but they also risk leaking water into your delicious creation (since the springform pan is never completely water-tight). There’s no need to use a water bath for cheesecake. Just minimize the air bubbles in the filling and cook it low and slow in the oven for perfect results. I tell you to keep the oven closed the entire time to control the temperature and cooling of the cheesecake. I also instruct you to “plop” the filling on the counter 100 times while it is still in the mixing bowl. While this may seem excessive, it has never let me down! This method ensures that your cheesecake will be evenly cooked without any hot spots. And because it cooks slowly, the risk of cracks is minimized. So give this method a try – your cheesecake will be delicious every time!
Dream Vanilla Cheesecake
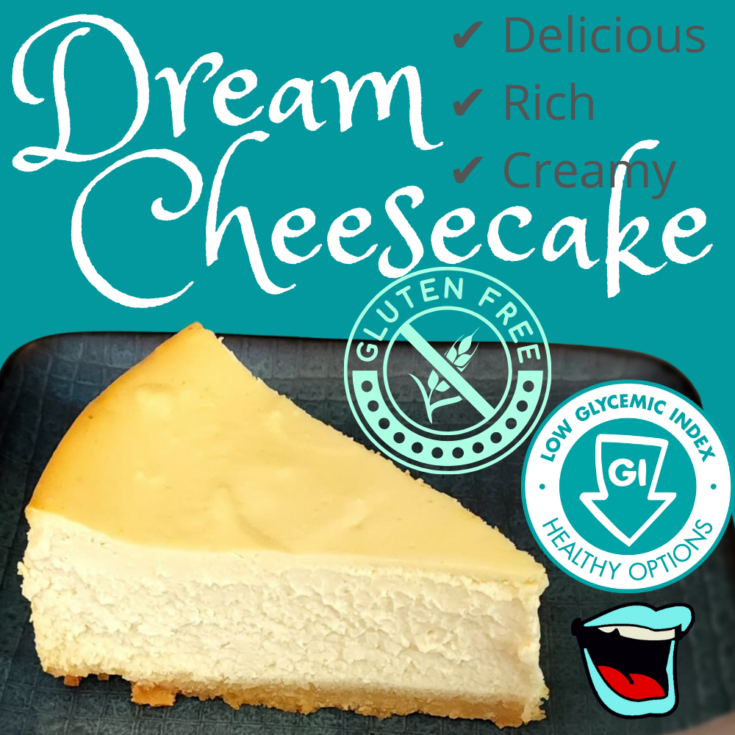
This is the most melt-in-your-mouth cheesecake I have ever tasted. It is not only simple but rich! Not only that, but it is both low GI and gluten-free.
Ingredients
- Crust Ingredients:
- - 1 1/2 cups Almond Flour (or Graham Cracker Crumbs for a more traditional crust)
- - 1/4 cup Agave nectar
- - 1/4 cup melted butter or margarine (1/2 a stick)
- Filling Ingredients:
- - 5 (8-ounce) packages of cream cheese (5 cups), softened to room temperature
- - 1 1/4 cups Agave nectar
- - 1/2 cup sour cream at room temperature
- - 2 Tbsp high-quality vanilla extract
- - 5 large eggs at room temperature
Instructions
Preparation (3 hours ahead):
Set eggs, cream cheese, and sour cream on the counter to reach room temperature. If using a large block of cream cheese, leave it out overnight to ensure it's not cold inside.
Baking Preparation:
Preheat the oven to 325 degrees F (163 degrees C).
The Filling:
Use a mixer attachment with a built-in rubber scraper to minimize air bubbles.
Place room-temperature cream cheese, Agave nectar, and sour cream into the mixing bowl.
Mix on low until creamy with only a few lumps.
Scrape the sides of the bowl to ensure all ingredients are incorporated.
Beat eggs and vanilla extract with a fork until scrambled in a separate bowl.
Carefully add this egg mixture to the cream cheese mixture until blended (a few lumps are OK).
Reducing Air Bubbles:
Place the mixing bowl with the cheesecake filling onto a sturdy counter that can take repeatedly being hit.
Holding it securely, lift the bowl about half an inch off the counter and drop it gently but deliberately onto its surface approximately
100 times, keeping both hands in place on each side of the bowl.
This process is essential because it helps release air pockets from the filling. As you plop the bowl onto the counter, you will see little bubbles escaping the mixture. Set it aside.
Pan Preparation:
Cut parchment paper to fit the bottom of the pan and strips to fit the sides. Leave some excess on the side strips, which can be trimmed after the next steps.
Spray the inside of the pan with cooking spray.
Place the cut parchment paper pieces on top of the layer of cooking spray.
Spray the tops of the parchment paper to ensure easy removal.
The Crust:
In another bowl, mix the crust ingredients until it resembles wet sand.
Press this mixture into the prepared 9-inch springform pan using a flat-bottomed glass, measuring cup, or flat meat tenderizer wrapped in plastic wrap to create a uniform, flat shape.
Assembly and Baking:
Pour the cheesecake filling over the pressed crust mixture in the springform pan.
Carefully place the pan in the preheated oven on the center rack (oven at 325 degrees F). Take care to hold the sides and bottom of the pan.
Do not open the oven during baking.
Set a timer for 30 minutes.
After 30 minutes, reduce the oven temperature to 250 degrees F.
Set another timer for 45 minutes.
Cooling:
After the second timer goes off, turn the oven off and resist opening the oven.
Set another timer for 45 minutes.
After 45 minutes, you may crack the oven door.
Once you no longer feel any hot air from the cracked oven, carefully remove the pan and place it on a cooling rack to cool to room temperature. Alternatively, leave it closed until the cheesecake and oven reach room temperature.
Finally, place the cheesecake in the springform pan, in the fridge in an upside-down pie holder, or cover it with plastic wrap to chill
overnight.
Serving:
When ready to serve, open the springform clasp and gently loosen all sides to remove that part of the pan.
If you wish, take a large, flat spatula and wedge it carefully between the bottom piece of parchment paper and the pan to lift/slide it onto the desired serving plate.
Finally, you can peel the parchment paper off the sides of the cheesecake before slicing it up.
Enjoy the creamy, rich goodness of your Dream Cheesecake!
FAQ:
Can I travel with this cheesecake without risking destruction?
A: Yes. I recommend keeping it in the springform pan, wrapping it completely with saran wrap, and placing it in an upside-down plastic pie container. The plastic wrap will keep it from sliding around in the container, and the pan will support its shape.
What is the best way to store the cheesecake?
A: As described in the serving section, I like to transfer the cheesecake into the lid-side of a pie keeper. I find the low lip on the lid makes it easier to slice it and easy to cover back up for each trip in/out of their refrigerator. It also allows me to give the cheesecake as a gift without lending out my pan, as well as clean the whole pan right away! Otherwise, keep it refrigerated.

Author: Jennifer Friesen
Hi, I'm Jiffy! I love to learn and share new things. I hope jiffytalking.com will become a friendly hub for people to share their interests and knowledge.